Showing posts with label Post. Show all posts

Display Post Summaries and Automatic Thumbnails


With only a few small changes to our Blogger template, we can display post summaries and thumbnails using this easy to manage hack.

How to add Blogger post summaries and thumbnails in three simple steps


Here's my step-by-step guide to the easiest solution for post summaries and thumbnails with Blogger:

Step 1 - Back up your template!


It is important to back up your Blogger template before making any edits. This ensures we can easily restore the working template if anything goes wrong.

You'll be prompted to save an XML file to your computer hard drive - this XML file includes all of the HTML and widget templates required to display your current Blogger design. Be sure to save this in an easy to remember location and make a note of the file name in case you later need to restore your working template.

Step 2 - Add the code to display summaries and thumbnails on non-item pages


The next stage is to add the Blogger code which will display a summary and thumbnail of our posts. Go to Design>Edit HTML and check the Expand widget templates box and search for the following line of code:

<data:post.body />

Replace this line with the following code:

      <b:if cond='data:blog.pageType != "item"'>
          <b:if cond='data:post.snippet'>
          <b:if cond='data:post.thumbnailUrl'>
              <div class='Image thumb'>
                <img expr:src='data:post.thumbnailUrl'/>
              </div>
          </b:if>
            <data:post.snippet/>
    <b:if cond='data:post.jumpLink != data:post.hasJumpLink'>
      <div class='jump-link'>
        <a expr:href='data:post.url + "#more"' expr:title='data:post.title'><data:post.jumpText/></a>
      </div>
    </b:if>
          <b:else/>
            <data:post.body/>
          </b:if>
      <b:else/>
      <data:post.body/>
      </b:if>


Preview the change to your template and you'll see that your posts will appear in a format similar to this:


As seen in the screenshot above, the thumbnail appears above the summary. We can align the thumbnail more cohesively to the left or right of the summary by adding CSS to our template.

At this stage, you can choose to save the edit to your template or add the CSS and preview the final effect before committing the changes to your site.

Step 3 - Add CSS to align the thumbnail image


While still on the Design>Edit HTML section of your dashboard, search for the following line:

</b:skin>

Immediately before this line, paste the following CSS statement:

.thumb img {
  float: left;
  margin: 0 10px 10px 0;
}

This will align the thumbnail to the left of the post summary, and allow some distance between the thumbnail and text like this:


If you would prefer to align your thumbnail image to the right, paste the following code instead:

.thumb img {
  float: right;
  margin: 0 0 10px 10px;
}

Preview your template to see how this makes your posts appear on the home page. When you're happy with the layout, save your template and enjoy your automated thumbnails!

How this customization displays summaries and thumbnails


While simple to add to our Blogger template in order for the function to work, there is a lot of complex conditional code in use to ensure the summaries display as they should.

First, the code checks if the page being viewed is an item page or not. If the page is not an item page, the summary/thumbnail code will come into effect.

The second check discovers if a post snippet is available (i.e: if the post contains some text). If there is a snippet, the code checks if a thumbnail is available and displays the thumbnail if there is, followed by the snippet. Where no thumbnail is available (when the post does not contain an image), only the snippet is displayed.

If there is no snippet available for a particular post, the complete body of text is displayed normally. This ensures that posts with no content or which feature only an image are displayed normally; no thumbnail is displayed, and any images are displayed at full size.

Finally, the code checks if the post contains the <!-- more --> tag. If it does not contain this tag, a "Read more" link will be displayed beneath the snippet, ensuring visitors can easily click through to read the post page. Where a jump-link is present, this is displayed as normal after the snippet.

60+ Tips On How To Get More Blog Traffic


The all-elusive blog traffic – how do you get more of it?
Here’s a little help, some from Seth Godin, some from yours truly; but either way, these 60+ tips to increase your blog traffic are yours to use or forget about.
  1. Use lists
  2. Be topical… write posts that need to be read right now.
  3. Learn enough to become the expert in your field.
  4. Break news.
  5. Be timeless… write posts that will be readable in a year.
  6. Be among the first with a great blog on your topic, then encourage others to blog on the same topic.
  7. Share your expertise generously so people recognize it and depend on you.
  8. Announce news.
  9. Write short, pithy posts.
  10. Start a debate.
  11. Encourage your readers to help you manipulate the technorati top blog list.
  12. Don’t write about your cat, your boyfriend or your kids.
  13. Write long, definitive posts.
  14. Write about your kids.
  15. Be snarky. Write nearly libelous things about fellow bloggers, daring them to respond (with links back to you) on their blog.
  16. Be sycophantic. Share link love and expect some back.
  17. Include polls, meters and other eye candy.
  18. Tag your posts. Use del.ico.us.
  19. Coin a term or two.
  20. Ask your readers questions.
  21. Do email interviews with the well-known.
  22. Answer your email.
  23. Answer your blog comments.
  24. Comment on other blogs.
  25. Use photos. Salacious ones are best.
  26. Be anonymous.
  27. Be interesting and mysterious.
  28. Encourage your readers to digg your posts. (and to use furl and reddit). Do it with every post.
  29. Post your photos on flickr.
  30. Encourage your readers to subscribe by RSS.
  31. Start at the beginning and take your readers through a months-long education.
  32. Include comments, so your blog becomes a virtual water cooler that feeds itself.
  33. Assume that every day is the beginning, because you always have new readers.
  34. Highlight your best posts on your Squidoo lens.
  35. Point to useful but little-known resources.
  36. Write about stuff that appeals to the majority of current blog readers–like gadgets and web 2.0.
  37. Write about Google.
  38. Have relevant ads that are even better than your content.
  39. Don’t include comments, people will cross post their responses.
  40. Write posts that each include dozens of trackbacks to dozens of blog posts so that people will notice you.
  41. Run no ads.
  42. Keep tweaking your template to make it include every conceivable bell or whistle.
  43. Write about blogging.
  44. Digest the good ideas of other people, all day, every day.
  45. Invent a whole new kind of art or interaction.
  46. Post on weekdays, because there are more readers.
  47. Write about a never-ending parade of different topics so you don’t bore your readers.
  48. Post on weekends, because there are fewer new posts.
  49. Don’t interrupt your writing with a lot of links.
  50. Dress your blog (fonts and design) as well as you would dress yourself for a meeting with a stranger.
  51. Edit yourself. Ruthlessly.
  52. Don’t promote yourself and your business or your books or your projects at the expense of the reader’s attention.
  53. Be patient.
  54. Give credit to those that inspired, it makes your writing more useful.
  55. Ping technorati. Or have someone smarter than me tell you how to do it automatically.
  56. Write about only one thing, in ever-deepening detail, so you become definitive.
  57. Write in English.
  58. Better, write in Chinese.
  59. Write about obscure stuff that appeals to an obsessed minority.
  60. Don’t be boring.
  61. Or be boring Ben Stein-style.
  62. Write stuff that people want to read and share.

Random Posts Widget with Thumbnails for Blogger


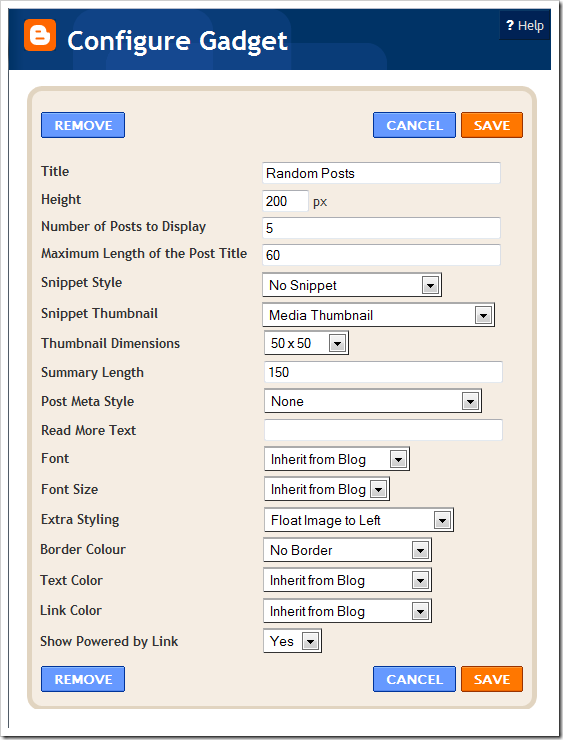
The Random Posts Gadget will  display a list of Random Posts(from your blog) on your Blog’s Sidebar. The Gadget has an options panel and can be configured to meet your needs. The Gadget inherits styles from your Blog. But you can override the colors if you want(this was done to support third party templates which doesn’t have the skin variables properly designed).

Photobucket

About the Various Options


Maximum Length of Post Title – Your post titles can be too long. In that case you can limit the title to x number of characters using this parameter.
Snippet Style – You can display the snippet with Post Summary, Post Thumbnail, or both or none.
Feed – The default Option “Summary Feed” will scan your post summary feed. This is the faster and efficient option and i would advise you to opt this one. If you choose  “Full Feed” , the gadget will be slower but you will get YouTube Thumbnails also.

Note:- If you want to grab the images or YouTube thumbnails, then you should have “Site Feeds” set to Full. If you opt for the Media Thumbnail only, then the short feed will be used by default.

Thumbnail Dimensions – Size of the Thumbnail in pixels. The gadget doesn’t generate any Thumbnail. It just uses the media thumbnail,YouTube thumbnail , or any image in the post and scales it to the specified dimensions.
Summary Length  -  If you have opted to display the post Summary, then you can control the length of the summary(in characters).
Post Meta Style – You can display the Post Date, Comment Count and a Read More Link. You can choose any combination of these three.
Font and Font Size– By Default, the container’s font and Font Size is inherited into the Gadget. But if you are using a 3rd party template, then these might not be properly inherited. In that case you can use this Option to over ride these parameters.
Extra Styling – Allows you to specify the position of the Thumbnail, and whether to underline the links or not.
Border Color – You can either opt for No Border, or select one of the 140 available colors. If you are not sure about how these colors look like, then take a look at this color chart at W3Schools - http://www.w3schools.com/html/html_colornames.asp
Link Color and Text Color – By default , the colors will be inherited from your Blog. If you want to override this, you can choose one out of the 140 different colors. (The colors were provided in the Dropdown(and not as text fields) to tackle a problem with the API)
Read More Text – This field was intentionally added to help blogs which are not written in English. Initially i used “More »” as the Read more text without taking any user Input. Seeing this on a non-English Blog is a little awkward. So i added this new field.

Add The Gadget to your Blog


Check out the Demo and Sample Configurations to see what the Gadget can do.

Demos
© 2011 Template For Blog. WP Themes by Skatter Tech. Bloggerized by Bambang Wicaksono.
Scroll down for Next Widget
 
BLOG MENU
Go
to
Top